
| ENGLISH | JAPANESE |
We need first to build a Web server on which we can run Servlet programs. We have three options in building our server:
Tomcat is developed in the Jakarta Project as part of the activities within The Apache Software Foundation. You can visit their download page to download binaries. Choose 'Release Builds' to download. The latest version is Tomcat3.1 (on 23rd June, 2000). We are going to install Tomcat under /usr/local. Download the file, 'jakarta-tomcat.tar.gz', which builds up the web server.
Copy or move 'jakarta-tomcat.tar.gz' to c:\cygnus\usr\local and unpack the archive as below:
~> ls d:/tmp/jakarta-tomcat.tar.gz
d:/tmp/jakarta-tomcat.tar.gz
~> cp d:/tmp/jakarta-tomcat.tar.gz c:/cygnus/usr/local/
~> cd c:/cygnus/usr/local/
/usr/local> tar xvfz jakarta-tomcat.tar.gz
jakarta-tomcat/
(... Suppressed ...)
/usr/local> ls jakarta-tomcat
LICENSE      bin/       conf/       doc/
lib/         src/       webapps/
/usr/local>
Define TOMCAT_HOME and extend your classpath as shown in figure[Editing AUTOEXEC.BAT for TOMCAT] by adding the two lines to your AUTOEXEC.BAT:
set TOMCAT_HOME=c:\cygnus\usr\local\jakarta-tomcat
set CLASSPATH=c:\cygnus\usr\local\jdk1.2.2\lib\tools.jar;%CLASSPATH%
Restart your PC to take the change into effect.
You can run Tomcat even before defining TOMCAT_HOME as long as you run jakarta-tomcat/bin/startup.bat under jakarta-tomcat/bin. The procedure to test Tomcat explained below was in fact tested before TOMCAT_HOME is defined in AUTOEXEC.BAT. (Note that the paths to jar files are shown as relative path. If you define TOMCAT_HOME, the paths are shown as absolute.)
You need to include 'tools.jar' in your classpath when you build a Web application using Ant tools, though the jar file is not requied for running Servlet programs. You had better therefore include 'tools.jar' at this stage.
To test Tomcat, change directory to jakarta-tomcat/bin and type 'startup.bat' as shown in figure[Starting Tomcat]:
~> cd /usr/local/jakarta-tomcat/bin/
/usr/local/jakarta-tomcat/bin> ls
ant*            jspc.bat*       shutdown.sh*    tomcat.bat*
ant.bat*        jspc.sh*        startup.bat*    tomcat.sh*
antRun*         shutdown.bat*   startup.sh*     tomcatEnv.bat*
/usr/local/jakarta-tomcat/bin> startup.bat
Starting tomcat in new window
Using classpath:
..\classes;..\lib\webserver.jar;..\lib\jasper.jar;..\lib\xml.jar;
..\lib\servlet.jar;c:\cygnus\usr\local\jdk1.2.2\lib\tools.jar;
c:\cygnus\usr\local\lib\jpl\jpl.jar;
/usr/local/jakarta-tomcat/bin>
Another window subsequently pops up, showing the message as shown in figure[Running Tomcat]
C:\cygnus\usr\local\jakarta-tomcat\bin>
Context log: path="/examples" Adding context path="/examples"
docBase="webapps/examples"
Context log: path="" Adding context path=""  docBase="webapps/ROOT"
Context log: path="/test" Adding context path="/test"  docBase="webapps/test"
Starting tomcat. Check logs/tomcat.log for error messages
Starting tomcat install=".." home="C:\cygnus\usr\local\jakarta-tomcat"
classPath="..\classes;..\lib\webserver.jar;..\lib\jasper.jar;..\lib\xml.jar;
..\lib\servlet.jar;c:\cygnus\usr\local\jdk1.2.2\lib\tools.jar;
c:\cygnus\usr\local\lib\jpl\jpl.jar;"
Context log: path="/admin" Automatic context load
docBase="C:\cygnus\usr\local\jakarta-tomcat\webapps\admin"
Tomat is now running. To check if you have successfully invoked Tomcat, evoke a browser to enter the URL, http://127.0.0.1:8080. You will see the Tomcat Opening Window as shown in figure[Opening Tomcat] if everything went well:
To shutdown Tomcat, simply type 'shutdown.bat' under jakarta-tomcat/bin in the window where you envoked Tomcat. The message shown in figure[Shutting down Tomcat] appears and the window figure[Running Tomcat] will close.
/usr/local/jakarta-tomcat/bin> shutdown.bat
Using classpath:
..\classes;..\lib\webserver.jar;..\lib\jasper.jar;
..\lib\xml.jar;..\lib\servlet.jar;
c:\cygnus\usr\local\jdk1.2.2\lib\tools.jar;
c:\cygnus\usr\local\lib\jpl\jpl.jar;
Stop tomcat
/usr/local/jakarta-tomcat/bin>
Consult "Tomcat - A Minimalistic User's Guide"(jakarta-tomcat/doc/uguide/tomcat_ug.html) for more detail.
You first make a directory where you produce all the files necessary to build your application. Let HOME/hello be a working directory (because we will create a very simple application that only displays 'Hello World' when invoked.
~> mkdir hello
Create etc, lib, and src directories under HOME/hello. We will put 'web.xml' under 'etc' and 'Hello.java' under 'src'. The 'lib' directory does not store any file, but it must exist while compilation. You need web directory, too. You can copy the directory, 'jakarta-tomcat/doc/appdev/sample/web', to your HOME/hello with all the files under it.
~> cd hello
~/hello> mkdir etc lib src
~/hello> ls
etc/  lib/  src/
~/hello> cp -R /usr/local/jakarta-tomcat/doc/appdev/sample/web .
~/hello> ls
etc/  lib/  src/  web/
~/hello> ls web
hello.jsp   images/     index.html
The 'web' derectory includes 'index.html' which you will open to invoke a Servlet program. The crucial part of the HTML file is the line 24, where a link to 'hello' is set to invoke our Servlet.
21:<p>To prove that they work, you can execute either of the following links:
22:<ul>
23:<li>To a <a href="hello.jsp">JSP page</a>.
24:<li>To a <a href="hello">servlet</a>.
25:</ul>
The class called 'Hello.java' is as shown in list[Hello.java] and put it under 'src'. You do not need to compile the Java program at this moment; It will be compiled automatically with other files comprising the sample web application when you run the script.
import java.io.*;
import javax.servlet.*;
import javax.servlet.http.*;

public class Hello extends HttpServlet {
	public void doGet (
		HttpServletRequest req,
		HttpServletResponse res
		) throws ServletException, IOException
	{
		res.setContentType( "text/html" );
		PrintWriter out = res.getWriter();
		out.println( "<html><head><title>Hello World Servlet</title></head>" );
		out.println( "<body>Hello, World!</body></html>" );
		out.close();
	}
}
The batch file, 'build.bat', contains a script to evoke Ant tool that creates the application. You can copy any file bearing the same file name in the distribution to your HOME/hello. Copy, for example, 'jakarta-tomcat/doc/appdev/sample/build.bat' to HOME/hello.
Below list[build.xml] shows 'build.xml' file for our example. The definition is almost the same as given in samples except the first two lines which specify the project name, 'Hello World', and application name, 'mytest', respectively. When you build your application, the files comprising your application are all put under '/usr/local/jakarta-tomcat/webapps/mytest'.
<!-- The project name is 'Hello World' -->
<project name="Hello World" default="compile" basedir=".">

<!-- The application name is 'mytest' -->
  <property name="app.name"       value="mytest"/>
  <property name="deploy.home"    value="${tomcat.home}/webapps/${app.name}"/>
  <property name="dist.home"      value="${deploy.home}"/>
  <property name="dist.src"       value="${app.name}.jar"/>
  <property name="dist.war"       value="${app.name}.war"/>
  <property name="javadoc.home"   value="${deploy.home}/javadoc"/>

  <target name="prepare">
    <mkdir dir="${deploy.home}"/>
    <copydir src="web" dest="${deploy.home}"/>
    <mkdir dir="${deploy.home}/WEB-INF"/>
    <copyfile src="etc/web.xml" dest="${deploy.home}/WEB-INF/web.xml"/>
    <mkdir dir="${deploy.home}/WEB-INF/classes"/>
    <mkdir dir="${deploy.home}/WEB-INF/lib"/>
    <copydir src="lib" dest="${deploy.home}/lib"/>
    <mkdir dir="${javadoc.home}"/>
  </target>

  <target name="clean">
    <deltree dir="${deploy.home}"/>
  </target>

  <target name="compile" depends="prepare">
    <javac srcdir="src" destdir="${deploy.home}/WEB-INF/classes"
           classpath="${deploy.home}/WEB-INF/classes"
           debug="on" optimize="off" deprecation="off"/>
  </target>

  <target name="javadoc" depends="prepare">
    <!-- TODO -->
  </target>

  <target name="all" depends="clean,prepare,compile,javadoc"/>

  <target name="dist" depends="prepare,compile">
    <jar jarfile="${dist.home}/${dist.src}"
         basedir="."/>
    <jar jarfile="${dist.home}/${dist.war}"
         basedir="${deploy.home}"/>
  </target>
</project>
The 'web.xml' as shown in list[etc/web.xml] specifies how the Servlet is invoked. 'servlet-name' stores the name of the Servlet, i.e., 'HelloServlet', whose (actual) class file is specified by 'servlet-class', that is, Hello(.class). The definition under 'servlet-mapping' specifies the way the Hello Servlet is called as URL. In the definition, a servlet named 'HelloServlet' is invoked as a URL, (http://127.0.0.1:8080/mytest)/hello, where 'http://127.0.0.1:8080/mytest' is its application domain and suppressed in the definition. The class file, 'Hello.class', is thus, invoked as a URL, 'hello', via 'servlet-name'.
<?xml version="1.0" encoding="ISO-8859-1"?>

<!DOCTYPE web-app
    PUBLIC "-//Sun Microsystems, Inc.//DTD Web Application 2.2//EN"
    "http://java.sun.com/j2ee/dtds/web-app_2.2.dtd">

<web-app>
    <servlet>
        <servlet-name>
            HelloServlet
        </servlet-name>
        <servlet-class>
            Hello
        </servlet-class>
    </servlet>

    <servlet-mapping>
        <servlet-name>
            HelloServlet
        </servlet-name>
        <url-pattern>
            /hello
        </url-pattern>
    </servlet-mapping>
</web-app>
Thanks to Ant tool, it is easy to build an application. Change your directory to HOME/hello. Then, run 'build.bat' as shown in figure[Building your application]. You can check if the directory, /usr/local/jakarta-tomcat/webapps/mytest, is created with the directory structure as presented.
~/hello> build.bat
Buildfile: build.xml
Project base dir set to: C:\cygnus\home\hello
Executing Target: prepare
Created dir: C:\cygnus\usr\local\jakarta-tomcat\webapps\mytest
Copying 2 files to C:\cygnus\usr\local\jakarta-tomcat\webapps\mytest
Created dir: C:\cygnus\usr\local\jakarta-tomcat\webapps\mytest\WEB-INF
Created dir: C:\cygnus\usr\local\jakarta-tomcat\webapps\mytest\WEB-INF\classes
Created dir: C:\cygnus\usr\local\jakarta-tomcat\webapps\mytest\WEB-INF\lib
Created dir: C:\cygnus\usr\local\jakarta-tomcat\webapps\mytest\javadoc
Executing Target: compile
Compiling 1 source files to
C:\cygnus\usr\local\jakarta-tomcat\webapps\mytest\WEB-INF\classes
Completed in 6 seconds
~/hello> ls /usr/local/jakarta-tomcat/webapps/mytest/
WEB-INF/    images/     index.html  javadoc/
~/hello>
The last stub is to edit '/usr/local/jakarta-tomcat/conf/server.xml' so that Tomcat can recognize your application. Open the file to edit its last part as shown in list[Editing jakarta-tomcat/conf/server.xml]. You need to add to it a definition with a tag, 'Context', which enables Tomcat to load your application kept under jakarta-tomcat/webapps/mytest upon request to 'mytest'.
        <Context path="/mytest" docBase="webapps/mytest" debug="0" reloadable="true">
        </Context>

    </ContextManager>
</Server>
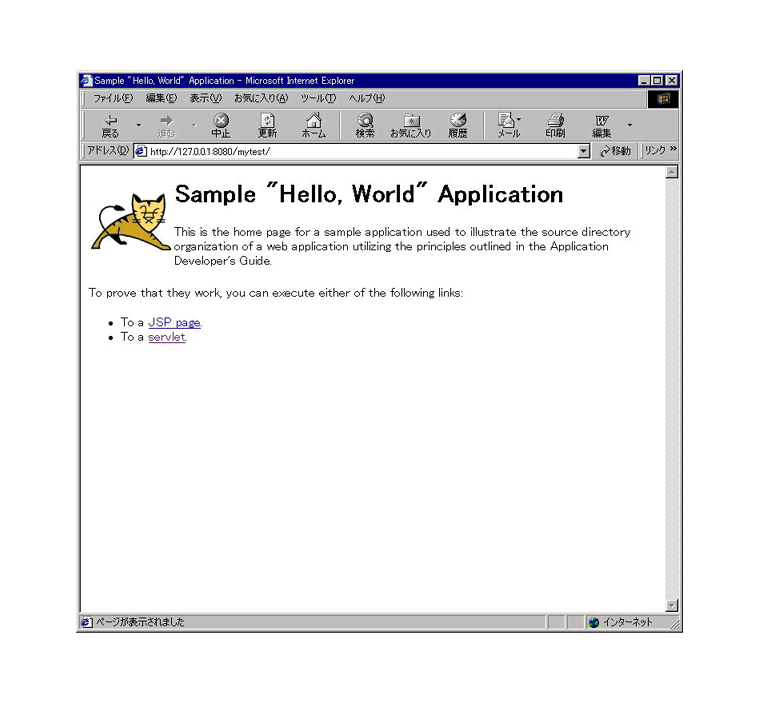
Stop Tomcat if it is running. Start Tomcat and enter the URL, 'http://127.0.0.1:8080/mytest/index.html' or 'http://127.0.0.1:8080/mytest/'. You should see the window opening as depicted in figure[Hello World Page].
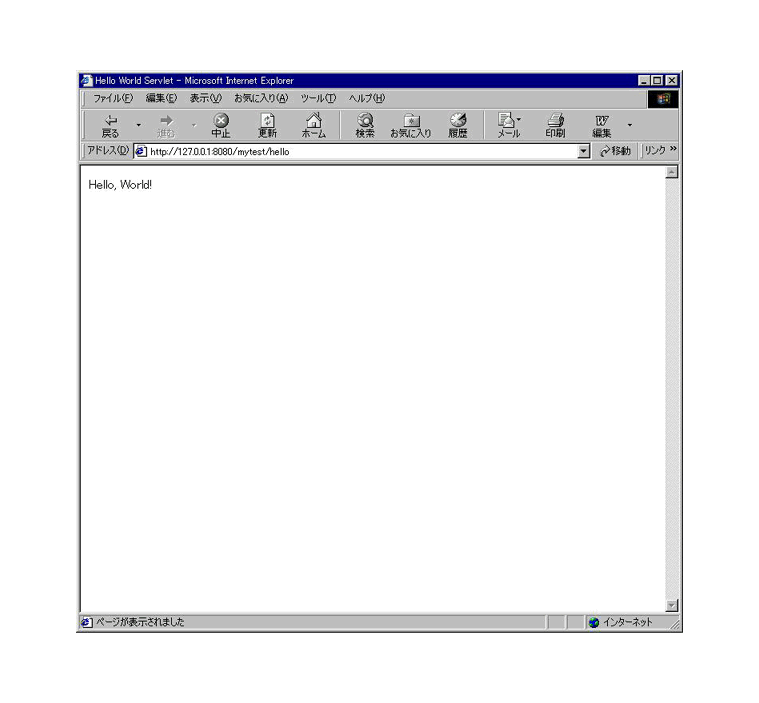
Upon cliking 'servlet' in the page, you will be carried into another page as depicted in figure[Hello World Servlet]. Note that you can evoke the same page directly by entering 'http://127.0.0.1:8080/mytest/servlet/Hello', too.
Consult Developing Applications With Tomcat, which you can find under 'jakarta-tomcat/doc/appdev' for more detail on developing web applications with Tomcat. You should especially take a look of Chapter 5, 'Dvelopment Process'.
We cover very basics of Servlet. Consult Servlet API Specification at SUN site and other publically available texts on Servlet for more detai.
The easiest way to send a pair of parameter and value from Browser is to use 'POST' or 'GET' method in 'form' tag. Below example list[paramTest.html] illustrates how a Servlet can be invoked from a Browser. In the description of action="/parTest/paramTest", '/parTest' denotes the application name, which we decided to call 'parTest'. The other string, '/paramTest', is a link name (URL) of the Servlet to be invoked.
<html>
<head>
<meta HTTP-EQUIV="Content-Type" CONTENT="text/html">
<title>Testing parameter-value pairs</title>
</head>
<body>
<form action="/parTest/paramTest" method="POST">
<input type="text" name="name">
<input type=submit value="SUBMIT">
</form>
</body>
</html>
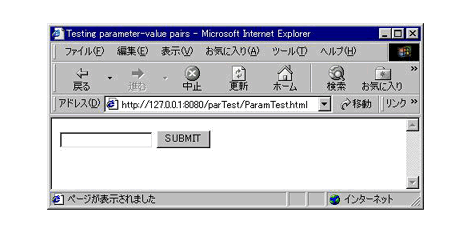
Let 'HOME/paramTest' be your working directory for this application and put 'paramTest.html' under 'HOME/paramTest/web'. When you have built your application, you will see the window as shown in figure[A sample form] appearing when you enter 'http://127.0.0.1:8080/parTest/ParamTest.html'. You can write any string, e.g., "fujinami" for test, and click the button, 'SUBMIT' to perform the action.
An instance, 'req', of HttpServletRequest class serves to receive data from Browser. To receive the list of parameter names, the method, getParameterNames(), is employed. To retrieve a value of each parameter, another method, getParameter() is employed as shown in list[paramServ.java]
import java.io.*;
import java.util.*;
import javax.servlet.*;
import javax.servlet.http.*;

public class paramServ extends HttpServlet {
	public void doGet (
		HttpServletRequest req,
		HttpServletResponse res
		) throws ServletException, IOException
	{
		res.setContentType( "text/html" );
		PrintWriter out = res.getWriter();
		out.println( "<html><head><title>Receiving parameter-value pairs</title></head>" );
		out.println( "<body>Using getParameter() method<br>" );
		Enumeration enum = req.getParameterNames();
		while( enum.hasMoreElements() ) {
			String name = (String)enum.nextElement();
			String value = req.getParameter( name );
			out.println( name + "=" + value + "<br>" );
		}
		out.println( "</body></html>" );
		out.close();
	}

	public void doPost (
		HttpServletRequest req,
		HttpServletResponse res
		) throws ServletException, IOException
	{
		doGet( req, res );
	}
}
To send back a HTML file from Servlet, an instance, 'res', of HttpServletResponse class is employed. The method, getwriter(), creates an instance, 'out', of PrintWriter class as shown in list[paramServ.java]. You can write strings by using println() method of 'out'.
You can run the sample as follows:
<!DOCTYPE web-app
    PUBLIC "-//Sun Microsystems, Inc.//DTD Web Application 2.2//EN"
    "http://java.sun.com/j2ee/dtds/web-app_2.2.dtd">

<web-app>
    <servlet>
        <servlet-name>
            paramServlet
        </servlet-name>
        <servlet-class>
            paramServ
        </servlet-class>
    </servlet>
    <servlet-mapping>
        <servlet-name>
            paramServlet
        </servlet-name>
        <url-pattern>
            /paramTest
        </url-pattern>
    </servlet-mapping>
</web-app>
Create HOME/paramTest/build.xml. You only need to edit build.xml above in two points. For project name, you can for example define it as follows:
<project name="Testing Parameter-Value pairs" default="compile" basedir=".">
For the base directory under which all the files are stored, we name it 'pTest'.
<property name="app.name" value="pTest"/>
<Context path="/parTest" docBase="webapps/pTest" debug="0" reloadable="true" >
</Context>
Start Tomcat and enter the ULR address, http://127.0.0.1:8080/parTest/ParamTest.html as explained above. You can fill the form with any string, say, "fujinami". Click 'SUBMIT' button. You are shortly seeing the window as shown in figure[The result upon clicking SUBMIT] appearing on display.
