Manual for Articulatory Synthesizer
Jianwu Dang
(2006/04/10)
1. Introduction
7. Insert a phoneme or segment
9. Calculation from target to sound
10. Show the animation and sound
11. Analysis of synthetic sound
12. Display acoustic and articulatory parameters
13. Display area function of the vocal tract (VT)
1. Introduction
This program is for testing the articulatory based speech synthesizer. Flowchart of the processing consists of target setting, acoustical parameter setting, calculation of the articulatory movement, sound generation, and visualization processing.
2. Start the program
After running the command “synthesis” in the command line of Matlab, Figure 1 will show up. It requires you to chose one executive program of the physiological articulatory model. Pushing the pushbutton, a file window will come out, see Fig. 2.
 Fig 1
Fig 1
After you chose an exe file, e.g. “modelC06.exe, a panel shown in Figure 3 will appear. The panel is the basic work space for this program.
 Fig 2
Fig 2

Figure 3: The main work space of the synthesis program
First, you should check the basic setting: which parameter file is used. Push the “setting” pushbutton in the low-left corner, an edit window as Figure 4 will come out
 Fig 4
Fig 4
3. Edit target file
You can edit an existing target file using the pushbutton “Edit target”. For the details of the target file please reference to the
|
2 cc mand-x
mand-y
Ttip-x
Ttip-y
Tdos-x
Tdos-y Lip-ln Lip-ac VelumA Section No use; x&y
values of mandible, Tip and dorsum, hundreds for control; Length and Area Area of Naso- number {(indecisive) x.x<10x.x<20x.x<…<80x.x
(crucial); 90x.x means disable} of Lip tube;
pharyngeal tube |
|
0.245 6000 -102.52 103.89 -101.76 104.75 1.84 4.70 0.60 1.40 0.00 |
|
0.200 6000 -2.11 2.81 -1.92 3.72 103.47 105.08 0.99 1.62 0.02 |
|
Phone F0 Gp Trot-x Trot-y Nap ghc CQ Label gwc shpc Type of f0 Subglottal Press
x&y of tongue root Noise Larynx height Close - Pharyn.
Width Shape
coef. Phones
Coefficient; (9xx
means disable) Amp. coefficient quotient
coefficient for 3D control |
|
udf 116.67 0.31 905.00 900.50 0.10 -0.01 0.98 s 1.00 1.00 |
|
vv 120.00 0.30 905.00 900.50 0.00 0.00 1.00 a 1.00 1.00 |
The button “Get Target” is to display the content of a target file.

4. Input a phoneme string
For text-to-speech function, you can input a phoneme string to the articulatory model if the “input” radio is checked. Sound will be generated also. This function is to test the coarticulation part.
5. Set articulatory target
The pushbuttons on the left-top are to set articulatory targets for the jaw, tongue tip, tongue dorsum, and the tongue root. In the popup menus, there are a number of choices: indecisive, crucial, no use, and disable. These values will reflect in the concerned target file. (see 3 for the details)
6. Set acoustic parameters
There are number of sliders for changing the values of the acoustic parameters.
7. Insert a phoneme or segment
If you are going to insert a phoneme or a segment in the target file, you can use “Add segmt n” button, where the “n” is the segment n inserted anterior. For the inserted phoneme, you can define the phone type as the following figure.
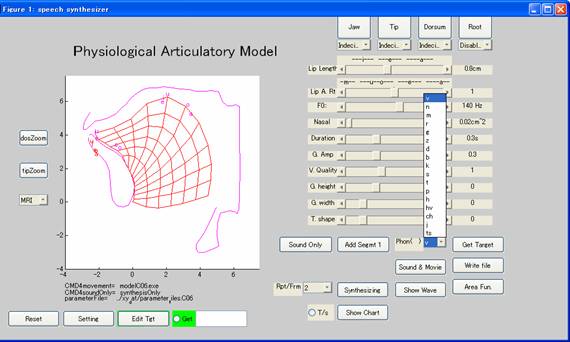
8. Save the target setting
If you want to save the target you set so far, please use the “Write file” button.
9. Calculation from target to sound
When the “Synthesizing” button in the right-low portion is pushed down, the program will carry out the processing from the target to sound via articulatory movements, area function, and acoustical model. The frame rate is defined by a variable of FPS. The default value is 50, while You can modify its value directly. You can change the computational step by a value in the popup menu next by the “synthesizing” button.

10. Show the animation and sound
You can show the animation of the articulatory movement and play the synthetic sound by using the “Sound & Movie”.
11. Analysis of synthetic sound
You can analyze the synthetic sound in the number of ways: waveform, spectrogram, and LPC. You can also compare the sounds from different resources such as derived from different articulatory and/or acoustic parameters. When the button “Show Wave” is pushed, another window will come out, please following the GUI to complete your analysis.
12. Display acoustic and articulatory parameters
After the articulatory movement is calculated, the width of the vocal tract (VT) is calculated and transferred to area function (AF) (See “VTwidth2AF” by C). Acoustic parameters are derived from the AF in “AF2parameter” by C. Finally, sounds are generated based on the acoustic parameters. To testify parameters, you can use the button of “chow Chart”. When the neighbor radio is checked, the display is “S/t”, acoustical parameters are displayed. In the normal case of “T/s”, the articulatory target will be displayed.
13 Display area function of the vocal tract (VT)
You can use the “Area Fun” button to show the area function with the VT shape. After pushing the button, a new window is coming out. Please following the GUI to complete it.