


Driver Installation (Mac)
1.
Download the Printer Driver from Website of FUJIFILM.
The model of multi printers is:
ApeosPort-VI C2271,ApeosPort-VI C4471,ApeosPort-VI C7771
The drivers same for these models. "FUJIFILM PPD File Installer for Mac OS"
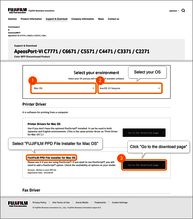
- Access the printer driver download site
https://www.fujifilm.com/fb/ja/support/multifunction-printers?category=128
※This site is available in Japanese only. Please use your browser's translation feature if needed. - Enter "C2271" (or "C4471" / "C7771") in the product name search field, then select ApeosPort-VI C2271 (or C4471 / C7771)
※Please select "ApeosPort-VI Cxx71" — not "DocuCenter" or "RC". - Select your OS
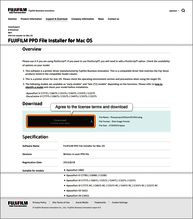
- Click FUJIFILM PPD File Installer for Mac OS, agree to the license terms, and proceed with the download
*Click the picture to enlarge*

2.
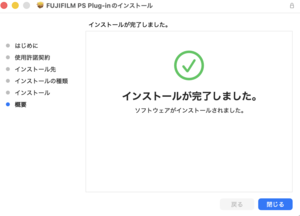
Extract the file and double click to install
3.
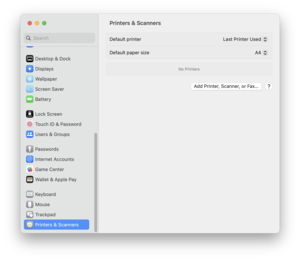
From [System Preferences], click on "Printers & Scanners"
click "Add Printer, Scanner, or Fax..."
5.
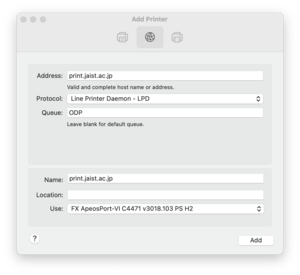
Select the [IP] tab do the setting up as follows:
Location Free Printing :
Address : print.jaist.ac.jp
Protocol : LPD
Queue : ODP
Name: your favorites name
Use:FF ... for ApeosPort-Ⅵ Cxx71 … PS H2
Direct Printing :
Address : print.jaist.ac.jp
Protocol : LPD
Queue : directly queue name
Name : your favorites name
Use : FF ... for ApeosPort-Ⅵ Cxx71 … PS H2
Direct refer to the list.
【How to select [Use]】
Click [Select Software]
-> In software list, enter the multifunction device number (e.g. C4471) in the search box in the upper right corner
-> Click "FF ... for ApeosPort-Ⅵ C4471 … PS H2" from the narrowed down candidates.
* If you cannot find the software in the "Select Software" list, the downloaded driver may be incorrect.
6.
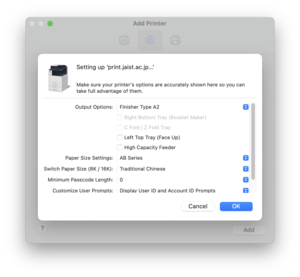
Depending on the model to be used, select the suitable option in"Output options".
Click "OK".
Model & Option List
Apeos Port IV C2271 : Finisher Type A2
Apeos Port IV C4471 : Finisher Type A2
Apeos Port IV C7771 : Finisher Type C + 中綴じユニット
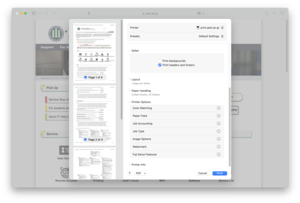
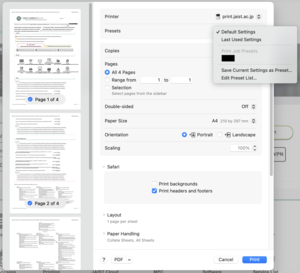
7.Run "Safari" to save the accounting preset.
Launch "print" dialog of safari and select "Printer Options" -> "Job Accounting".
Click "User Details Setup".
【In case the "Printer Options" does not appear】
- In some applications, please click [Show Details] or [Print using System Dialog].
- If the print screen is similar to the image on the right, but you cannot find [Job Accounting] in [Printer Options], please try re-adding the printer, changing the printer name, restarting the device, etc.
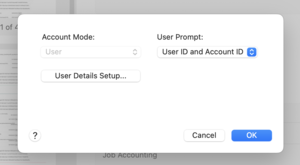
8.
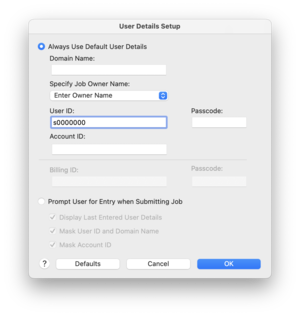
Change "Specify Job Owner Name" to "Enter Owner Name", enter user ID and passcode then click "OK".Domain Name, Account ID is unnecessary.
When you use "Direct Print" Password input is required.
9.
In [Preset], select "Save current settings as preset".
10.
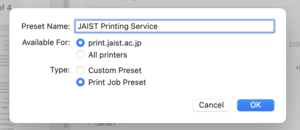
Set an arbitrary name for [Preset name] and click "OK".
Direct List
| Number | bldg. | Place | LPR Queue Name |
| 4 | KS | KS I bldg. K-71 7F | C1K717 |
| 22 | IS | IS I bldg. I-91 9F | J1I919 |
| 23 | IS | IS II bldg. I-94 9F | J2I949 |
| 25 | IS | IS I bldg. I-81 8F | J1I818 |
| 26 | IS | IS II bldg. I-84 8F | J2I848 |
| 27 | IS | IS III bldg. I-87 8F | J3I878 |
| 28 | IS | IS I bldg. I-71 7F | J1I717 |
| 29 | IS | IS II bldg. I-74 7F | J2I747 |
| 30 | IS | IS III bldg. I-77 7F | J3I777 |
| 31 | IS | IS I bldg. I-61 6F | J1I616 |
| 32 | IS | IS II bldg. I-74 6F | J2I746 |
| 33 | IS | IS III bldg. I-67 6F | J3I676 |
| 34 | IS | IS I bldg. I-51 5F | J1I515 |
| 35 | IS | IS II bldg. I-53 5F | J2I535 |
| 37 | IS | IS I bldg. I-41 4F | J1I414 |
| 38 | IS | IS II bldg. I-44 4F | J2I444 |
| 39 | IS | IS III bldg. I-47 4F | J3I474 |
| 40 | IS | IS I bldg. I-31 3F | J1I313 |
| 41 | IS | IS III bldg. I-37 3F | J3I373 |
| 46 | IS | IS II-III bldg. I-25 2F | J23I252 |
| 47 | IS | IS III bldg. I-27 2F | J3I272 |
| 50 | MS | MS I bldg. 5F | M15 |
| 64 | MS | MS IV bldg. 7F | M47 |
| 67 | MS | MS IV bldg. 4F | M44 |