


S/MIME Function(Thunderbird and WebMail)
[IMPORTANT] About change of a client certificate via the J-UPKI System (2023/08, 2024/10 Update)
Client certificates (personal certificates) issued after the J-UPKI system maintenance work performed on August 25, 2023, from 4:00 PM to 5:00 PM can be used in the following ways:
1. Wireless LAN connection (SSID: JAIST)
2. One authentication factor for the Integrated Authentication Infrastructure System (JAIST-SSO)
"Wireless LAN connection (SSID: eduroam)" (after 2024/10) and "S/MIME (electronic signature and encryption for email)" cannot be used.
"S/MIME (electronic signature and encryption for email)" can be used by issuing a separate client certificate for use with S/MIME.
If you would like to issue one, please contact RCACI.
▼Announcement regarding the unification of authentication methods for eduroam services▼(2024/10)
https://www.jaist.ac.jp/iscenter/news/973/
Client certificates (S/MIME certificates) issued to JAIST users before the J-UPKI system maintenance work performed on August 25, 2023, from 4:00 PM to 5:00 PM can be used in the following ways:
1. Wireless LAN connection (SSID: JAIST)
2. One authentication factor for the integrated authentication infrastructure system (JAIST-SSO)
3. S/MIME (digital signature and encryption for email)
Prepare for S/MIME Function (Thunderbird)
Import own digital certificate.
1.Click「Account Settings」from the "Tools" menu on the toolbar displayed by pressing the 「Alt」 button.
2.Click「End-to-end Encryption」in your account settings on the left side of the「Account Settings」window, and then click「Manage S / MINE Certificates」displayed at the bottom right.
3.The Certificate Manager window will appear, click on the Your Certificates tab, and click「Import」.
4.Select the digital certificate you want to import. Navigate to the location where you saved it, select the digital certificate you want to import, and click「Open」.
5.Enter the password to open the encrypted and stored certificate. Enter the password you set when you downloaded the certificate and click「OK」.
6.If the password you entered is correct, you will see the message「Certificate and private key have been successfully restored.」Click「OK」to close the window..
7.repeat 1. to 3. untill you confirm your own certificate.
Send Email with Digital Certificate (Thunderbird)
1.Click "Account Settings" from the「Tools」menu on the toolbar displayed by pressing the「Alt」button.
2.Click「End-to-end Encryption」in your account settings on the left side of the Account Settings window.
3.Click「Select」under「Personal Certificate for Digital Signature」on the right side of the screen.
4.Select the digital certificate you just imported and click「OK」.
※If you want to always send an e-mail with a digital signature, check "Require encryption by default" in the "Set message sending rules" field.
5.Close the Account Settings window and exit.
If "Security"-> "Digitally sign this message" is checked in the mail composition window, the mail will be sent with a digital signature.
Secure Email
Secure Email is one of the encryption methods that improve the security of e-mails. You can use digital certificates to encrypt e-mails and digitally sign e-mails.
If the email you sent is frequently judged to be SPAM, we recommend that you use the Secure Email function 「Send email with a digital signature」.
Procedure for sending an email with a digital signature
Classic UI
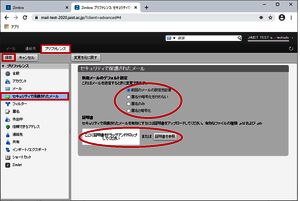
- On the 「Preferences」 tab, select 「Secure Email」.
- Check 「Signature only」 in 「Default settings for new mail」 and drag and drop a valid certificate in the 「Certificate」 field or specify a valid certificate from the browse button.
- Click 「Save」.
- Compose and send emails as usual and all emails will be digitally signed.(Or, on the mail composition screen Select 「Signature」 from the menu displayed at the top of the window and send.)

Modern UI
- Click the gear icon ☸ at the top right of the screen, and click 「Settings」 from the View menu.
- Select 「S/MIME and Encryption」.
- Check 「Sign」 in 「Default settings for new mail」 and if "You do not have any security certificates currently" in the 「Certificate」, click 「+Add a certificate」to import a valid certificate.
- Click 「Save」.
- Compose and send emails as usual and all emails will be digitally signed.(Or, on the mail composition screen Select 「Sign」 from the menu displayed at the top of the window and send.)