


Client certificate issuance procedure
Issuance application
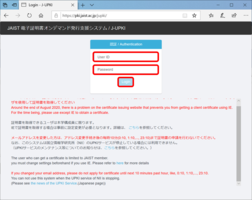
1. Access the J-UPKI system.
Only accessible from campus networks including SSL-VPN
(When you are off-campus, please connect to SSL-VPN before accessing the system.)
2. Enter your user name and password to log in.
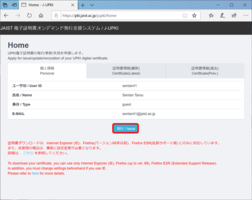
3. Click 発行 / Issue .
When the certificate has already been issued, 発行 / Issue will not be displayed.
If you have an issued certificate file (.p12), please read from "Importing the certificate".
If you do not have an issued certificate file, please go to "Revoking a certificate".
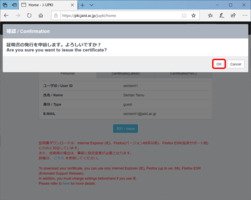
4. When the confirmation screen appears, click OK .
It may take up to 30 minutes for the issuance process to be completed.
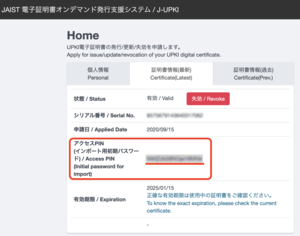
Check the access PIN and Download the certificate
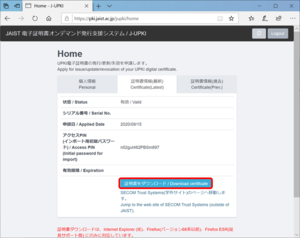
5. When the issuing process is finished, the "状態/status" field will change to "有効/Valid".
The "Access PIN (initial password for import)" is used to import the certificate.
It is recommended that you make a note of your access PIN.
* You can also check it after downloading the certificate.
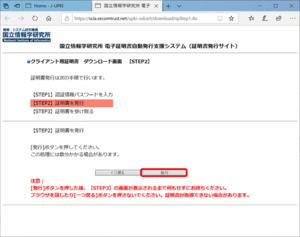
6. Click the 証明書をダウンロード / Download certificate button.
7. The [STEP2] screen of the certificate issuance site by the National Institute of Informatics will appear. Click the 発行 (Issue) button on the right.
[Notice]
Click the button only once, and then wait without doing anything else.
After clicking, the screen appears unchanged for about 30 seconds, but there is no problem. If you click more than once, the certificate will fail to be issued.
A file with .p12 extension will be downloaded.
* If the screen of [STEP1] appears and you are asked for your password, the issuance has failed. Please contact us.
8. Save this p12 file.
Installing
For details on how to install the certificate, refer to the following manual provided by NII.
* Don't import to a PC that may be used by others.
* Don't forget to check "Mark this key as exportable" in the Certificate Import Wizard for Windows OS.
[Password required at the time of import]
The password required when importing downloaded files is listed in the "Access PIN (initial password for import)" of the J-UPKI system (only available on campus LAN including SSL-VPN).
- The password for the private key (Edge and Chrome on Windows OS)
- The password for "XXXX.p12" (Safari and Chrome on mac OS)
- The password that was used to encrytp this certificate backup (Firefox)
- The password to extract the certificate (Android OS)
- The password for certificate (iOS)
For exported certificates, the password will be the one you set yourself.
UPKI Digital Certificate Issuing Service Manual
*When using the on-campus Wi-Fi service (SSID: JAIST / eduroam), please refer to the following.
[Windows OS] Internet Explorer/ Edge/ Chrome/ Opera (Windows) Edition
[mac OS] Safari/ Chrome/ Opera (macOS) Edition
[Android OS] Android Edition
[iOS] iOS Edition
Import of certificates issued after December 14, 2023
Please note the following procedure when importing certificates issued after the maintenance on or after December 14, 2023.
[Windows]
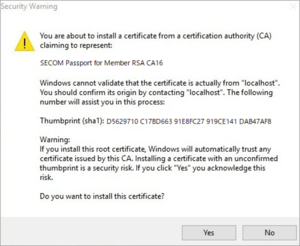
- For the certificate store, check "Automatically select the certificate store based on the type of certificate".
- If the root certificate is not installed, a Security Warning screen will pop up. Confirm that the "thumbprint (sha1)" is "D5629710 C17BD663 91E8FC27 919CE141 DAB47AF8" then click "Yes".
For more information, please see the following page (in Japanese).
個人認証用証明書CAのプライベート化による、証明書のインストール方法の変更点が知りたい
【mac OS】
- If a dialog box regarding trusting certificates appears, go to Details and confirm that the "Fingerprints SHA-1" is "D5 62 97 10 C1 7B D6 63 91 E8 FC 27 91 9C E1 41 DA B4 7A F8" and select "Always Trust".
- If the message "Certificate is not trusted" is displayed after importing the certificate, similarly, check the "Fingerprint SHA-1" under "View Information" in the root certificate. If it is correct, select "Always trust" for "When using this certificate" under "Trust".